Length of Pull
|
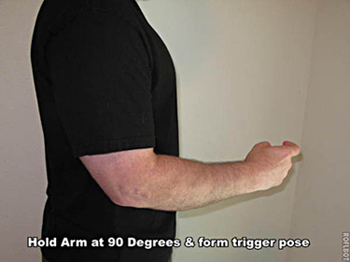
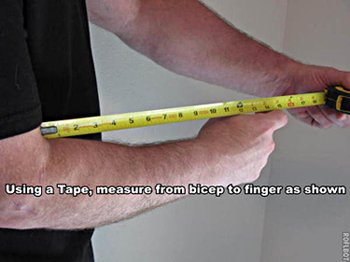
Length of pull is measured between the front of the trigger blade and the back of the recoil pad. The correct length of pull is determined by gripping the stock by the pistol grip with finger extended to reach the trigger, and holding the stock along the inside of the forearm with the elbow bent at 90 degrees. The butt of the stock, with recoil pad fitted, should just fit to the bicep.
You can measure the fit without a gun by holding the trigger finger in a forward reaching position as you would on the actual gun and measure from the pad on the finger to the inside of the bicep with the elbow held at 90 degrees.
It is recommended that you try out various length of pulls with an action in a factory stock and tape blocks of wood or other spacer to the back of the stock, or remove it's recoil pad plus spacers if it's too long to begin with.
Considerations of length of pull are the intended shooting position, clothing to be worn, and location of the optic's eye relief, and trigger release location.
Eye relief
Can you lay your head down and forward in a comfortable stance and have the correct eye relief through the scope, or do you need to crane your neck back in order to see through the scope even with it mounted as far forward as you can? Often lengthening the pull by 1/2" or an inch can move the scope just that little bit forward so you can get a view.
A related concern is you want to be able to lay your cheek down on the stock in a repeatable way, so that you develop 'muscle memory' and can achieve your perfect shooting position without hesitation. Choosing a LOP that lets you find that spot on the stock every time while looking through the sighting system perfectly lined up is one reason to build a stock custom fit to your body. Certainly with my 6 foot adult male body when I shoot the standard factory stock with a 13" LOP I feel like I'm shooting a Red Ryder. My eye comes about to the end of the action if I lay down on the stock the way I want to. Shooting a gun with a LOP cut to fit me is a wonderful feeling.
Trigger location
Of special concern for us airgunners is our two stage triggers, and perhaps you might have installed, or plan to install, a set back trigger. If you measure from the sear release location of the trigger it may skew the result the same way measuring from a very forward position of a trigger with a long first stage travel may skew the measurement in the other direction. If you are using such a trigger, communicate with me about it, and you may choose to let me know several different measurement locations (like the back of the trigger guard) to make sure I get the LOP right where you want it.
Shooting Position
Field Target 'pretzel' position, 10 meter offhand, or field hunting application each requires a different kind of fit. 3 position target guns often have adjustable length of pull to accomodate the three different lengths required.
Clothing
A gun cut to fit t-shirt weather may be too long when wearing a thick parka in the snow, and a gun cut to fit curled up in a field target sitting position may put the eye too close to the scope when offhand hunting. A shooting jacket with a thick pad on the shoulder can also affect the length of pull.
For those that are making their own stock that want to know how to cut and mount a recoil pad:
CUTTING THE STOCK: Wrap the area to be cut with masking tape. Cut through the tape. After determining the place to cut, cut the butt end of the stock on a miter saw (chop saw). A particularly nice version of the saw would be a sliding miter saw. If you don't have one, it shouldn't take asking more than a friend or two to find one as they are quite common among those who do house repairs or construction work. Use a fresh 60 tooth blade. Don't cut right on your cut line with the first cut, rather creep up on it with successive practice cuts, making sure all angles are good. Leave the saw blade down until it stops spinning. If you plan to leave the end of the stock exposed, perhaps checkering it or using a skeleton butt plate instead of a recoil pad, to avoid burn marks make smooth complete motions with the saw. Don't try to go all the way through all at once. Make smooth shallow, increasingly deep cuts, but allow no pausing, not the slightest briefest pause. The very instant the blade sits in one spot for a fraction of a second it will cause a burn mark. Smooth constant motion will ensure a clean cut that needs only fine finish sanding. Make sure your final cut is cutting through at least a full width of the blade, preferably a bit more. A cut that is less than the full kerf width of the blade may make the blade slip over the edge of the wood and cause an angled cut.
MOUNTING THE PAD: Oil the butt end first before mounting the pad so the wood is sealed. Tip: To make installing screws easier, put a bit of silicone grease, Vaseline, or white lithium grease on them. To minimize tearout of the holes in the pad, use a bit of grease on the screw driver.
To use a pad jig, scribe a line around the butt of the stock onto the recoil pad's base, mount to pad jig, set angles, and sand to shape on a belt or disk sander.
Best results are achieved by mounted the pad to the buttstock and sanding it down to the wood on a belt sander. Use the platten side of the belt sander to get close, then use the slack side of the belt sander to finish. Sand until the wood and the pad both get sanded a bit to make for a perfect fit.
NOTE: The pictures below show the trigger finger bent at 90 degrees. DO NOT DO THAT. Instead, hold the trigger finger in a forward reaching position as you would on the actual gun. Our two stage triggers have a long pull. We do not want to put the finger on the trigger with the finger already at 90 degrees. We may finish the stroke of the trigger at 90 degrees, but we start reaching forward rather significantly for it.
|