How To Photograph Wood
I'm not a photographer. I really know very little about it. But I have been taking pictures of wood for a long time and I think I've got that pretty well figured out. If you've seen some of the pictures on my web site you know what I'm talking about...the wood really pops in them. I often see guns listed for sale that have poor pictures of the wood so I took an hour just now and wrote an article on how I take photos:
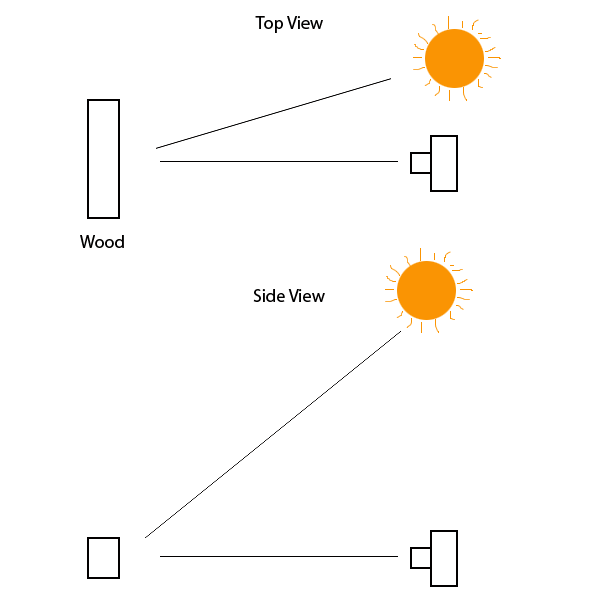
Gunstocks photograph best when the sun is over one shoulder shining on the stock, and the gunstock is turned at an angle one way or the other to find the spot where the color and figure pop. Depending on the grain (water bearing tunnels basically) flow into or out of the gunstock in relation to the angle to the sun, greater or lesser angle to the camera might be better.
Be dynamic with your body as you frame the shot, ideally looking through a finder if the camera has one, viewing the gunstock from high to low and side to side. Move around with your body and your head looking at the stock from all angles and heights to find that one spot where the color and figure pop. If your camera does not have a finder, make sure to hold the camera at the position of your eyes so you catch the perfect angle you’re looking at it from.
Move in as close as you can to the stock with the lens at the longest focal length you can in the range of 50-120mm. At 130mm and above there is less light gathered but better depth of field, but that same depth of field will make one end of the stock in focus and the other out of focus, which can be used to cool effect, just make sure you're getting the end you want in focus. I would say in general you don't need to go over about 120mm on the long end and 50mm is really too short but if that's all you have just make sure to move in close to the stock in order to get it to fill the frame.
Pay attention to the focus indicator lights and move the camera perhaps significantly out of alignment with the shot you want to take just to get the focus light to illuminate on an area you want in focus, then while holding the shutter button half way down to the hold the focus, swing back in to frame the shot.
When taking the picture, level the frame, make sure it’s spaced left and right to the gunstock because you’ll be right at the edges if you’ve moved in close enough, hold your breath, and take the shot.
To process the image, open them in your favorite image editing program. Gimp is an open source (free) solution every bit as good as Photoshop. I use Photoshop and I resize them, typically 72dpi and 1500 pixels wide. That makes for a big picture that will fill anyone’s screen but not be too big to send.
Do Unsharp Mask and Auto Tone. Undo and redo Auto Tone as a blink comparison and decide whether you want to keep it or not. Some pictures it makes a major difference good or bad, but often it’s a good result and really improves the color accuracy of the shot.
Save as jpeg of course, and quality 8 is plenty good enough and keeps the file size reasonable.
|
|